Do you use interfacing? For making bags, pouches, bowls? Maybe garments? If your answer is positive, I am sure you have many leftovers, small scraps you don’t want to throw to the trash.
I consider interfacing (especially the heavyweight one) as valuable as the fabrics I use in my projects. I am happy I found a way to use every bit of it !

 These boxes use 5 squares of interfacing. I made the smallest with 4’’ squares, but if you have smaller scraps you can make them even smaller. The medium size box used 5’’ squares and the largest 6’’.
I have leftovers of Fast2Fuse, this is a heavyweight fusible interfacing. You can use non-fusible interfacing as well.
Other heavyweight interfacing you can use for great result: Pellon Peltex, Decolvil I.


You can make such boxes in no time. Lets’ start!
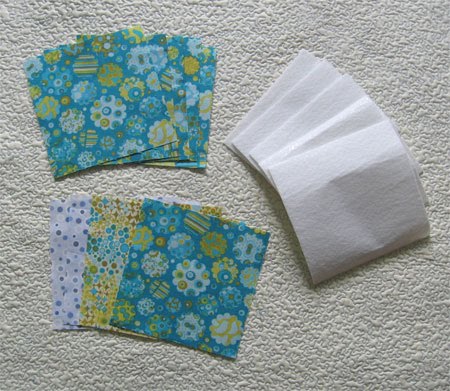
You need:
– 5 squares of interfacing;
– 5 squares of fabric for the interior of the box;
– 5 squares of fabric for the exterior of the box.
I used quilt weight cotton fabric.
– Jeans/Denim needle #100/16.
 Fuse the fabric to the two sides of interfacing. You will end up with 5 heavyweight squares.
 I like sturdy boxes.
- Fast2Fuse is very stiff, if your interfacing is lightweight, use more layers. You can add even batting.
- If your interfacing is not fusible, just make a sandwich with all the layers and quilt it to hold them together; then cut out of it a square in the desired size.
- You can pair lightweight interfacing with heavyweight fabric.
I added a few straight lines of quilting to my squares.
 Lay the squares on a surface with the exterior facing up. To form the box, we have to attach the exterior squares to the central square.
Attach first the left and the right squares then add the top and bottom squares.
 Here is how to stitch the edges of the squares together:
Join the pieces using a dense zig-zag stitch and be sure you catch both edges. Use the wider zig-zag stitch you can make with your machine.
Backstitch at the beginning and ending of each seam.
 Here the left and right squares are attached.
You can use a decorative thread in the needle and any thread you want in the bobbin.
 Here all 4 squares are attached to the base. This will be the exterior of the box.
 Detail.
 Turn the piece on the other side – this will be the interior of the box.
Now we have to stitch the corners. Keep the interior facing up. Fold the piece in half on the red line (the diagonal of the center square). Keep the edges aligned.
 As shown, stitch the edges together using the same dense and wide zig-zag stitch.
 Detail after stitching.
 And here is the first corner.
 Repeat and stitch the other corners.
 Finish the top edges in the same manner, with a dense and wide zig-zag.
 The box is finished, you can add some embellishments if you want.


Variations for more decorative boxes
Instead of plain fabric squares, I used pieced blocks.
 You can add even labels – with the content of the box or maybe the name of the kids. Do this before starting assembling the box.

I hope you will find this tutorial useful.
Do you need more box pattern ideas? Click on the images below.


Happy sewing!


I love those boxes, useful, cute and easy!
Many thanks for the tute.
That's the easiest fabric box I have seen! Thanks for the tutorial 🙂
Hugs, Penny
Thanks for all your lovely helpful tutorials. I have made bowls before but now I must try a box!
Thanks for the great tutorial. Great idea to use scraps.
Thanks for another great tutorial. Love those little boxes. Would be great in Christmas fabric to put little gifts in.
Hiya,
Wonderful tutorial, great for my craft nite.. I have four daughters and a fourteen yr old granddaughter that come to my home on Thurs nites and we do crafts.. They love it and I totally enjoy being w/my girls..
Thanks so much,
Linda J
VA
sehr schöne Idee, werde ich auch probieren ….danke
Wow! Lovely! I WANT them! Well done.
with love,
Ineke
Thanks for this cleaver idea. I can think of many uses for them. I love it.
The boxes are really cute, Geta! Thanks for the tutorial — they look much easier with your instructions. 🙂
Thank you for this cute idea. can't wait to get started making them.
Tina
Thanks for the tutorial, looks easy the way you posted. I'm going to give it a try!
Thank you, Geta! So cute.
Grazie tante Geta , sei molto gentile oltre che tanto brava. . Il tutorial è molto carino e utile quando non si è molto esperte !!!.
You are always so creative! Love the boxes.
These are too cute – thank you very much for this tutorial!
How fun…that is sooooooooooo cute!
Gosh these are super! Very kind of you to give directions as well. Thank you for taking the time to share.
Geta, thank you very much for this tutorial!
Those are really cute boxes.
Thanks for the tutorial! So cute and easy.
Candi
Thanks for the tutorial, they are pretty!!!
LOVE them!!! Can't wait to dig in my interfacing stash. Thanks so much for posting.
Very cool!!
Paulette
Wonderful boxes!!
sunt superbe cutiutele .multumesc pentru ca le-ai impartasit cu noi.
esti tare harnica si priceputa.
love it. great idea! perfect for my little girls bedroom in which she loves to keep her keepsakes and teeny tiny dolls shoes, clothes etc etc.
Oh, the boxes are sooo cute!
I can't wait to try them; thanks for sharing.
Do you think they'd work in a bigger size? I'd like to make bigger ones to organize my yarn…I could use the boxes to sort the yarn.
Hola Geta!!!!gracias por el tutorial,,me encanta,,como todo lo que haces,,heres genial
Un saludo de.
Angeles Diaz
España
These are lovely! How nice to make for gifts. Thank you for sharing your tutorial. Best regards, Dianne B. in England 🙂
Thank you so much! This was a very helpful tutorial! I do have lots of heavy interfacing that I have been wanting to use. I really can't remember why I bought it in the first place! Can't wait to get started.
Love your tutorial… thanks for sharing!
Great tutorial, beautiful idea for scraps and gifts. From south Brazil, Sandra
sandypoa05@gmail.com
congratulations from brasil! very nice tutorial. the easiest fabricbox seen on net!
i became a follower. very nice blog also
Elisa
baudetrapinhos.blogspot.com
Geta, I have been making these little boxes like crazy. I blogged about it on my blog and linked back to you. Just wanted you to know. http://www.marilynpond.blogspot.com
Delightful little boxes. Excellent tutorial. I can't wait to make these. Your tutorial definitely goes into my list of favorite tutorials. Great job.
SewCalGal
http://www.sewcalgal.blogspot.com
Delightful little boxes. Excellent tutorial. I can't wait to make these. Your tutorial definitely goes into my list of favorite tutorials. Great job.
SewCalGal
http://www.sewcalgal.blogspot.com
Very cute, Geta!!
Nice boxes, love the way you show us.
Thank you for your tutorial on Fabric boxes. It was easy to follow. Very clear instructions. I had to choose a different stitch when I had to sew the pieces together, since my sewing machine does not have the same stitch you used. It still turned out pretty good. I will do more of them so that I use up the scraps of fabric, which I have a lot of it. It's a fun project!
Very Cute, Thanks!
Fantastic!
Just posted this project on my site as my to do list!
http://www.makeasilkpurse.com/2010/11/links.html
This is a great idea! The boxes look fabulous!
Hello , I saw you on totally tutorial and come here to see the complete how to do.
Its great, very lovely, and I am sure easy to make and I ll try some for my work table, you describe it in a very detailed manner, no confusion, nothing un clear. thanks for sharing… I am following you now..
I would love if you please pay a little visit to me at
http://craftaworld.blogspot.com/
Hope you enjoy your visit there and let me know about it.
Love
Farah
Thanks for this great tute! I was just thinking that I needed to make a few little boxes, but hadn't gotten around to thinking about how to do it. Now I don't have to think=)
Hi Geta!
I'm from Brazil, I never saw a box so easy to do! Lovely this tutorial, I now know where using up my scraps!
Thanks for sharing!
Kisses!
Louise
http://arteemfuxicoecia.blogspot.com/
Gracias por compartir algo tan lindo. Muy bueno tu tutorial, muy bien explicado. Me lo llevo para hacerlo en algún momento.
Yasmin
http://www.patchworkmipasion.blogspot.com
Hello Gettta…please connect with me at madamesamm@cogeco.ca
from Stash Manicure..love to ask you something….?
btw absolutely divine boxes
Parabéns pelo blog, amei as caixinhas!!! São lindas…
Estou te seguindo para ficar sempre por dentro das novidades, visita meu blog, espero que goste, trabalho com biscuit e mdf!
Parabéns mais uma vez. Beijinhos…
OMG! Those are the cutest ever little boxes. 🙂 Thanks so much for the tute!
Love the boxes…and a tutorial, too! Thanks for sharing.
these are so fun! thanks for sharing the tutorial, I look forward to making them some day
What a cool idea… and what a great tutorial! Thanks…. I'm gonna have to try my hand at these!!!
Thank you, Greta,
I made this Box (my first quilting or patchwork project ever!) and it was fun! fun! fun!
I shared your link (and a photo of my box) on my facebook page, I hope you don't mind :o)
What a beautiful, happy, fun tutorial. You are so generous to share this with the world. I will be whipping one of these up today, so I won't forget your easy methods! Thank you!
…they ar absolutely great and lovely!!!!
Many and thousand thanks :O)
Bye
Gabi
Thanks that I´ve to make sometimes
Marianne
In the Trapunto quilts – how do you get the pattern to show white whilst the fabric is another colour? Even is
f you insert the Trapunto it wouldnt show white under the dense coloured fabric?
Anxious to know the secret.
I love this! Even I can make those on my old sewing machine. Thanks for the great detailed tutorial.
Jan
Love this idea!! Thanks for sharing!
Feliz Día. Mil Gracias por darnos la oportunidad de realizar Labores Preciosas y de Gran Utilidad. Con Gran Cariño desde Venezuela.
Amazing!! I must make…..I have now become a follower. I love trapunto,you have made some beautiful quilts etc. Unfortunately I have not made enough time to do more.
Me encantan las cajas, con tu permiso las copiare.
un abrazo…
BEAULTIFUL!
following me
http://artesanatocomjornalbyaninha.blogspot.com.br/
kisses
Aninha
These boxes are very pretty and easy as well. I'm going to make one right now!
These boxes are very pretty and easy as well. I'm going to make one right now!
This is the most amazing box tutorial I ever seen online.. I want to try it.. I have a few questions can you please help me out here?
1. How thick is fasttofuse that you used here?
2. What thickness of cotton batting you used to make these?
3. Backstitching with zig zag does it cause entanglment ?
Diya, read about the Fast2Fuse interfacing here- it comes in 3 weights.
http://www.ctpub.com/fast2fuse/
The heavyweight interfacing is much better than batting! If you can’t find it, then use the thickest cotton batting.
I haven’t experienced any trouble when zig zag stitching.